All posts for this blog are listed, visible, and linked to here.
2009
Three years and three months ago ... (8/10/09)
Why my wife and I bought our cordless electric mower in the first place.
Getting replacement parts; customer reviews at amazon.com (8/11/09)
Includes the review I wrote at Amazon.
Circuit details (8/15/09)
Photos of inside the mower.
Electric circuit schematic.
The Remington MPS6017A electric mower (9/19/09)
Handy home-made tool; fixing a broken wire (10/31/09)
Handy tool for propping mower cover open.
Fixing a broken wire.
Helpful links (11/1/09)
Links for both the CMM1000 and CMM1200:
Instruction manuals online (.pdf format)
Where to get replacement parts
Product pages at Amazon
Fixing a problem (June 2009) (11/12/09)
Replacing the circuit breaker.
2010
New electric mower models coming from Black and Decker (1/30/10)
The CM1836, CM1936, and MM1800
Mower specs (1/30/10)
Incomplete -- voltage, current, RPM, weight, and cutting width for different B&D mowers.
The battery (4/30/10)
How to prolong battery life.
Buying a replacement battery.
More about batteries.
Common problem with CMM1200; Broken Hinge Pin on the Switch Lever (5/30/10)
Step by step, with photos.
Cordless electric string trimmers (a.k.a. "weed whackers") (7/23/10)
Choosing and using a cordless electric string trimmer
2011
Wobbly wheels and how to fix them (5/14/11)
Step by step, with photos.
Table of Contents (6/30/11)
Another new battery (7/16/11)
Replacing the mower batteries (again).
An online lawnmower forum (8/17/11)
(It's called Lawn Mower Forum)
.
Thursday, June 30, 2011

Saturday, May 14, 2011
Wobbly wheels & how to fix them
Table of Contents
Today I fixed my lawnmower wheels which seem to have gotten rather wobbly in the 5 years we have owned our mower. I'll explain how I did this shortly, but please do be sure to read the next paragraph.
Important note: if you have a question to ask, please ask it at Lawn Mower Forum, either in the Black & Decker area or the Electric & Battery Operated area at that website. I apologize for being unable to handle individual requests for help posted on this blog or sent by email.
The first thing you should know before reading this is that the lawnmower wheels probably should be a little wobbly and not perfectly rigid. To make them perfectly rigid means having things so tight that they will not turn easily and freely. It looks like it would be pretty difficult to loosen wheels that have been overtightened, so be careful if you try this procedure not to pound too much with the hammer.
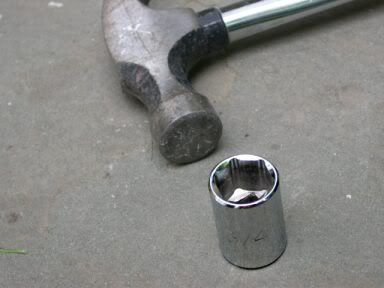
For tools you'll need (1) a hammer and (2) a 3/4" or 19 mm socket from a socket wrench set.
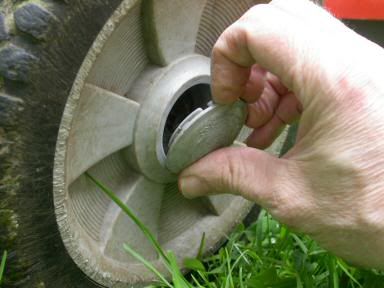
After removing the safety key, insuring that the mower will not start accidentally, you'll need to pop off the plastic hub caps from the wheels. This can be done with your fingernails, though it may be easier to use a flat blade screwdriver or knife blade.
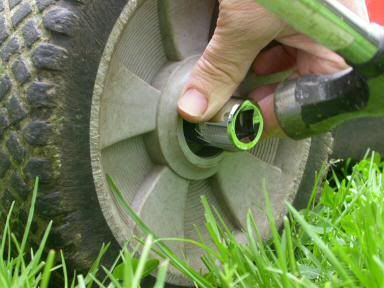
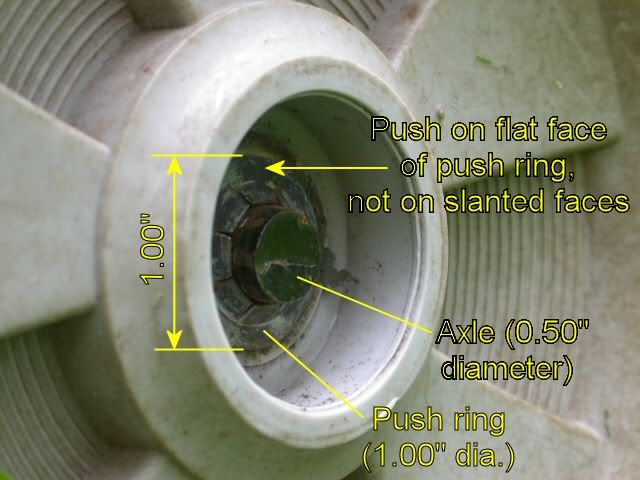
Next, hold the socket against the wheel -- hex side in toward the axle, square side facing out. Tap the square socket with the hammer, easily at first. Check for movement of the push ring (the thing that resembles a washer) by wiggling the wheel from side to side after every couple of hits, and gradually increase the hammer force until it is enough to move the push ring inwards towards the wheel. Do not pound the push ring so far that it is pushed tight against the wheel! You need to leave some clearance so that the wheel still turns freely. The idea here is to reduce the wobble, not to eliminate it entirely.
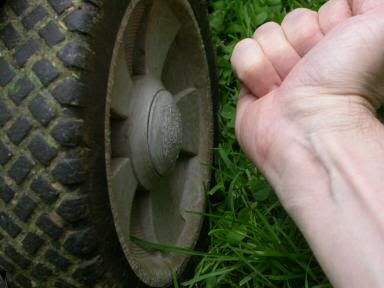
After adjusting the push ring, replace the hub cap by pounding it with your fist until you hear it snap back into place and you're good to go.
A final note about this procedure. You will notice that the washerlike push ring has two parts, (1) an outer flat part and (2) an inner slanted, cone-shaped part. The force from the hammer blows should push on the flat face, not on the slanted part. That's why the 3/4" socket is the right size for doing this, as it pushes completely outside of the slanted faces. A 1/2" socket, which would just slip over the 1/2" axle, would push on the slanted faces of the push ring. I did try it this way at first, but found that the push ring would not budge.
Friday, July 23, 2010
Cordless electric string trimmers (a.k.a. "weed whackers")
Table of Contents
"In my next blog I plan to discuss cordless electric string trimmers to augment the pollution-free, low-noise mowing experience."
Important note: if you have a question to ask, please ask it at Lawn Mower Forum, either in the Black & Decker area or the Electric & Battery Operated area at that website. I apologize for being unable to handle individual requests for help posted on this blog or sent by email.
I wrote that about 3 months ago, as I wrapped up my blog entry on mower batteries. After much procrastinating here is my experience choosing and using a cordless string trimmer.
Not using a corded string trimmer
Before getting our cordless trimmer, my wife and I did own a plug-in version for several years. It was a perfectly good trimmer from Black and Decker -- but having to get out, and later put away, the 100 foot extension cord was enough of a deterrent that it only got used 2 or 3 times per season. My routine was to avoid using it by being as diligent as possible with the mower around the lawn's edges, and just letting the grass get tall around our more delicate plantings. It finally dawned on us that we should own either a string trimmer that actually gets used, or none at all.
Choosing a string trimmer
The first step in choosing a cordless string trimmer is whether to go with a NiCd or a lithium battery model. My experience with other cordless power tools has nudged me towards lithium, and for primarily two reasons. (1) lithium batteries are newer technology, and superior to NiCd (longer life, longer run time, lighter weight, holds charge longer when not in use) and (2) chargers provided with lithium tools tend to be better than the ones provided with NiCd tools, in terms of not overcharging and damaging the battery -- at least this is true of the NiCd tools I currently own. Of course, you do have to pay more for a lithium trimmer, but it really is worth it. A friend of ours who owned a cordless NiCd string trimmer complained that it would not run very long before the battery needed recharging.
After an internet search I found 3 lithium battery models to choose from. This site has a comparison of the Worx GT WG151 and the Troy-Bilt TB57, and there is also the Black and Decker LST1018. The customer reviews of the Worx GT seemed more favorable than the others, and I liked that it was available with a fast 30-minute charger. (It's also available with a slower 3-5 hour charger, so if you buy it make sure you are getting the one you want.) So in the end I ordered the Worx fast-charging model.
By the way, I generally make a point of checking out customer reviews at amazon.com whenever spending this kind of money ($150.00 in this case) on a power tool, and recommend that you do so as well.
Using the string trimmer, pros and cons
First, and briefly, the obvious benefits: not as loud as a gas-powered trimmer (but noticeably louder than an electric mower), and no power cord to contend with. It's nice to have something I can quickly grab from the closet -- yes, that's where we keep it -- and touch up the yard after a mowing.
I was also pleased to discover that the Worx trimmer automatically shuts off when the battery charge gets low, thereby preventing battery damage from deep discharging. I don't know if the other string trimmers I looked at have this feature, but it does seem to be an all-too-common problem among cordless mowers.
Now for my main complaint. This trimmer can put a strain on your back if you let it. That was my experience the first two times I used it. And the second time, I really overdid things by using it for about 1/2 hour (that's when the battery needed recharging), and then for another 15 or 20 minutes after a quick recharge. My back was noticeably stiff the following day, though not in a debilitating way. Since then, I have learned to limit each use to about 20 minutes or less, and to switch between a left-handed and a right-handed grip every 5 minutes or so; I have had no problems since adopting this practice. As a result having the fast charger is not really a bonus, though owners of larger yards might still find that feature useful.
A minor complaint is that I apparently don't get how to use the edging feature. The head can be rotated so that the string cuts vertically, rather than horizontally, making a nice clean edge along a sidewalk for example. But the handle must be held at an awkward angle when doing this, whereas our old corded trimmer did edging much more easily.
All in all I'm glad we have a cordless trimmer and so far am quite happy with it, in spite of the two drawbacks I discuss above.
Update - posted 25 Dec. 2010
After about a month into owning the Worx GT WG151 string trimmer, the battery died suddenly last August. As it was under warranty, Worx replaced it for free, for which I am thankful.
I did not use the trimmer a whole lot for the rest of the season, so we will have to wait and see if the new battery holds up better than the first one did. If I had it to do over, I would have gotten the slower-charging version of this trimmer, as I wonder if the fast 30-minute charger might be too hard on the battery. I am surprised that a lithium battery failed so quickly; hopefully it was just a defective battery and not indicative of a systemic problem.
Sunday, May 30, 2010
Common problem with CMM1200: Broken Hinge Pin on the Switch Lever
Table of Contents
Our friend, who owns a CMM1200 mower, was unable to run her mower because of a broken hinge pin on the orange switch lever. This is the pin that allows the switch lever to pivot and turn the mower on:
Important note: if you have a question to ask, please ask it at Lawn Mower Forum, either in the Black & Decker area or the Electric & Battery Operated area at that website. I apologize for being unable to handle individual requests for help posted on this blog or sent by email.
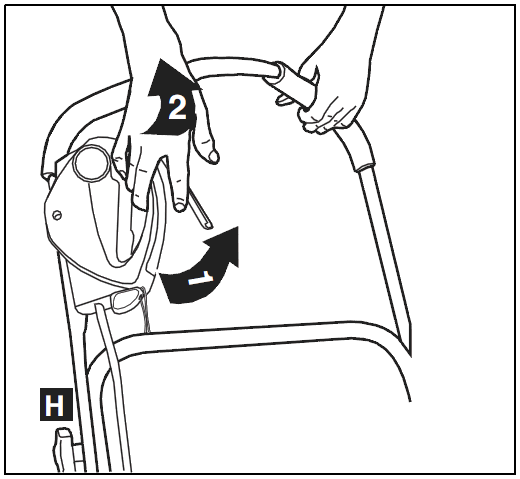
From the Black & Decker CMM1200 Instruction Manual.
Before I detail how to fix this, let me just say this appears to be a common problem on the CMM1200, judging from owners' comments at both Amazon and eReplacementParts. It also looks like Black and Decker later redesigned the mower so that, in the Type 2 version, the pin is a $1 replacement part instead of a part of the larger, more expensive switch clamshell. So owners of CMM1200 Type 2 mowers may want to simply order the pin replacement here.
To fix my friend's mower (a Type 0 version, which I didn't even know existed until now), it was necessary to come up with some makeshift hinge pin, and drill a hole in the outer clamshell to accommodate it. If possible, I wanted it to:
- Be made of metal, or include metal, so that it would not break again, and
- Not have exposed screw threads that would rub against (and possibly damage) the orange switch handle.
- A 1-1/2" long, 4-40 screw, (preferably stainless steel or brass, or other non-rusting material)
- A 1" long, 3/16" diameter nylon spacer
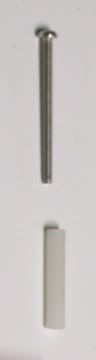
Screw and spacer
Tools I used for this job include:
- A power drill
- A screwdriver for size T25 Torx head screw
- Drill bit for 4-40 tap - ideally size #43, but 5/64" worked for me.
- A 4-40 tap and tap wrench
- A hole punch
- A hand file
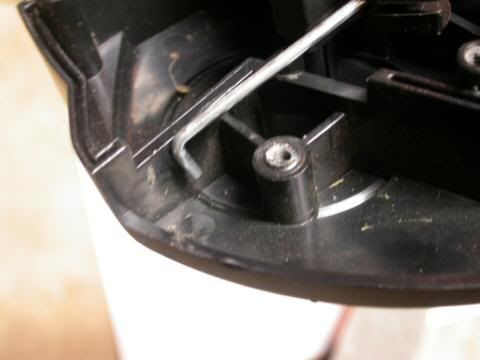
Drilled-out portion of lower clamshell. This is where the original plastic pin was located before it broke off.
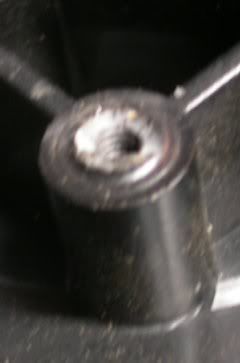
Close up view.
I won't offer instructions on how to tap a threaded hole -- it's really better to be shown in person how to do this, as it is just too easy to do it wrong and strip the threads. If you don't have the means to tap threads yourself, consider drilling a 1/4" deep hole that you can slip the 4-40 screw into; a 1/8" drill would work for this.
The screw head was too big to fit into the socket of the upper clam shell, but not by too much. I inserted the screw in my power drill, turned on the drill, and rubbed the screw head against a hand file until it finally fit in the socket. The locked-on feature of my drill made this easy, as it freed up a hand that would otherwise have to hold the trigger in the on position.
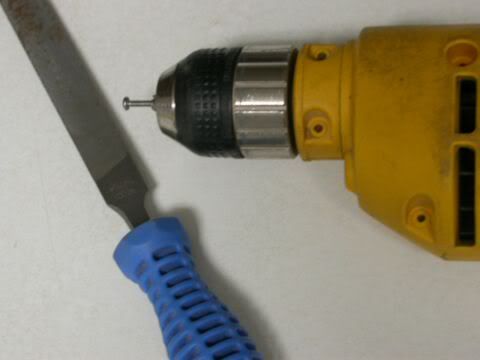
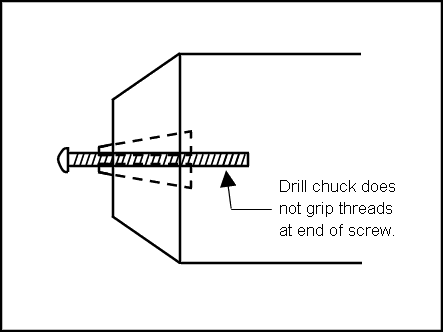
Insert the screw far enough so that the end threads are not damaged by the drill chuck.
Next, I hand-tightened the screw and spacer into the threads in the lower clam shell. It would be easy to strip the plastic threads by overtightening with a screwdriver, since it is a metal screw and the threads are rather small. (Ideally I would have preferred larger 6-32 threads, but I couldn't think how to incorporate that screw size in an easy, satisfactory way.)
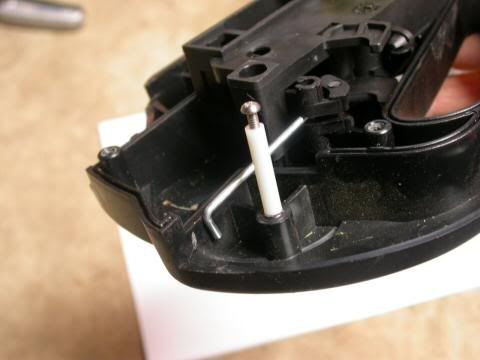
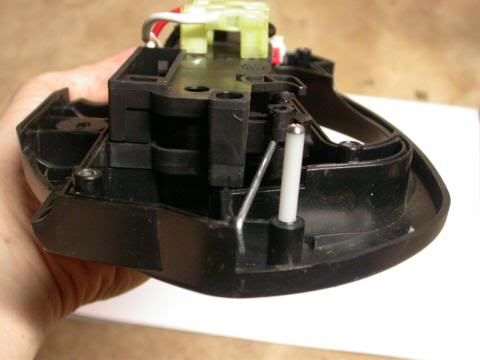
The lower plastic clam shell (which used to include the now-broken-off plastic pin) and new hinge pin.
For the final steps:
- the spring and switch lever are slipped over the makeshift pin
- the heavy wire switch link is fitted into the hole in the switch lever
- the two outer clam shells are screwed together
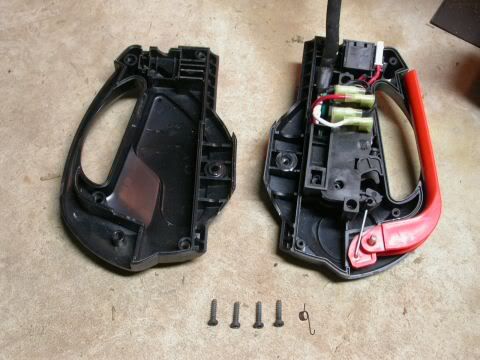
Upper clam shell at left; lower clam shell with orange lever at right. At this point of the assembly process, I had no idea what the spring (to right of 4 screws) was for. Nor did I include it when taking this photo; what you see here is a sketch of the spring that I have photoshopped into the picture. In fact the spring should already be in the assembly here, not laying aside with the still-to-be-used parts.
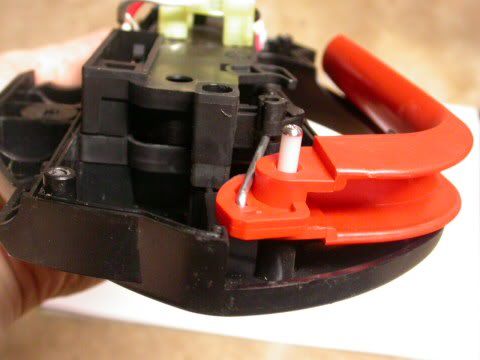
Lower clamshell, with orange lever and new hinge pin.
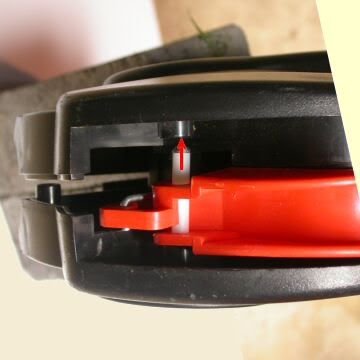
Upper & lower clamshells, showing socket that accepts the screw head.
(Pssst! Don't forget the spring -- missing here, see next pic).
(Pssst! Don't forget the spring -- missing here, see next pic).
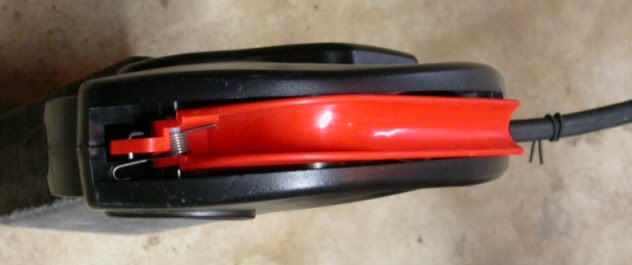
The switch assembly is finally together, including the spring.
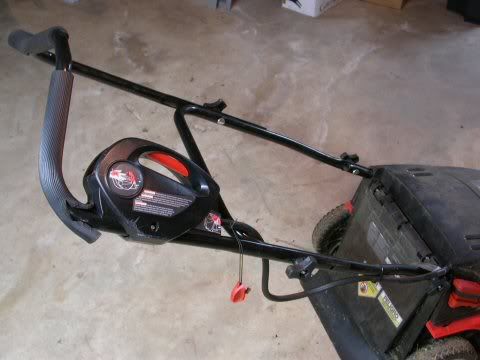
After testing that the mower will start, you are ready
to reattach the switch assembly to the mower handle.
to reattach the switch assembly to the mower handle.
There are any number of ways to fashion your own hinge pin.While 3/16" is a suitable and easy-to-find part diameter, it really just needs to be able to fit though both the 0.227" holes in the orange handle as well as the 0.205" hole in the upper clam shell. At eReplacementParts, "Jeff DC" has suggested cutting 1-1/2" from a standard door hinge pin.
Finally, for those of you who have yet to break the plastic pin on your mower, you might consider drilling a hole through it for a 4-40 screw, which would then provide a metal reinforcement.
Update, 9 Sep. 2012: It is worth mentioning here that a lot of people have been successful using a 3/16" x 1-1/2" tension pin, as first commented on by Catherine in August of 2010. Also known as roll pins or spring pins, people have obtained them at True Value Hardware, Ace Hardware, and Lowe's for less than $1.00. (Presumably Home Depot, and other home centers and hardware stores, would have these as well.)
So, a big Thank You to Catherine for the idea.
Subscribe to:
Posts (Atom)