Saturday, August 15, 2009

Circuit details

Table of Contents

Important note: if you have a question to ask, please ask it at Lawn Mower Forum, either in the Black & Decker area or the Electric & Battery Operated area at that website. I apologize for being unable to handle individual requests for help posted on this blog or sent by email.


Today we'll be getting fairly technical. After some photos of the mower's innards, we'll check out the circuit schematic. This is intended for people with an understanding of basic electronics; if you're not one of those people, just enjoy the cool pictures!

When we remove the black plastic cover from the mower, we find that the two batteries are secured with a strap and two styrofoam blocks:
Click on photo for full picture.

Four cables are used to connect the batteries, motor, and main circuit board to one another:
 Click on photo for full picture.
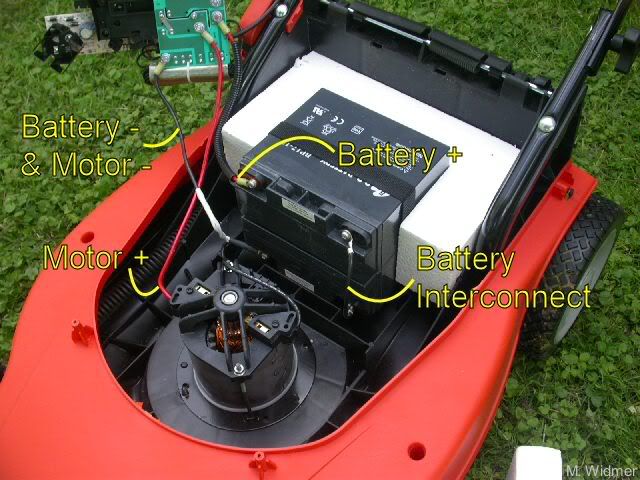
Note the wiring of the two 12V batteries in series, to generate 24V for the motor.

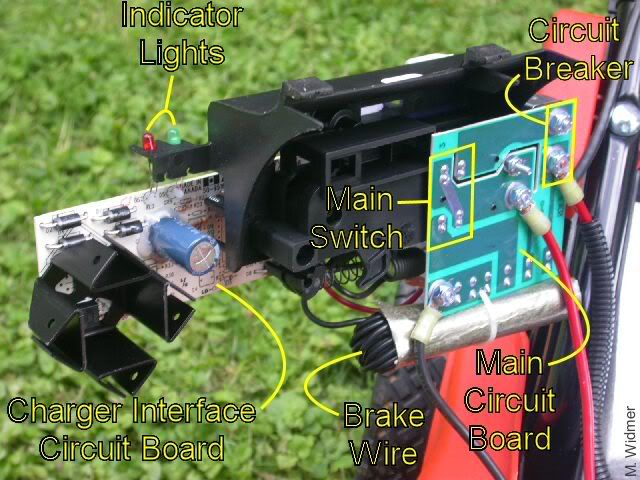
There are two printed circuit boards inside the mower. Black and Decker says nothing about them in the owner's manual, so I have taken it upon myself to name them:

1. The Main Circuit Board (green side visible in photo below) sends power from the battery to the motor. It contains the main switch and circuit breaker.

2. The Charger Interface Circuit Board (white side visible in photo) controls the recharging of the batteries, and is (apparently) not active when the mower is in use.
Click on photo for full picture.

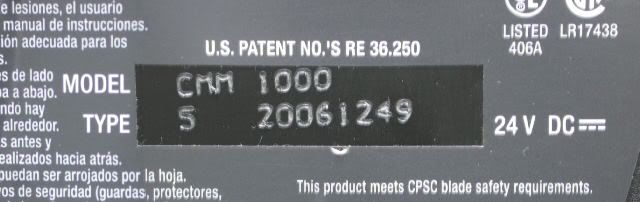
Here is the circuit schematic for the CMM1000, Type 5. I imagine Types 1 through 5 may all have the same circuit, and perhaps the CMM1200 does as well, but I wouldn't swear by it.
Click on figure for full picture.

Some rambling observations about the circuit:

1. The two 12V batteries are wired in series to produce 24V. The batteries that come with the mower are from B.B.Battery, model # BP17-12 (17 Amp-hours, 12 Volts). I have since replaced them with 22 Amp-hour batteries of the same physical size. I'll write more about them in a future blog.

2. The Main Circuit Board controls the power to the motor via a circuit breaker and the main switch. The main switch is controlled by a cable that runs up to the handle where you, the user, pull on it using the switch lever.

3. If the mower is running and the operator releases the handle, the main switch returns to the "Off/Brake" position. This disconnects the battery and instead shorts the motor terminals. Without going into details, the short provides a fast breaking action for the motor rather than letting it spin down gradually. When the breaker opens and the handle is not released, the main switch stays in the "On" position and the motor spins down gradually.

4. The brake wire used to short the motor is rather long, and makes 14 loops of a roughly 5" x 1" area. (See 3rd photo.) Perhaps this is to provide some small inductance, but I don't understand exactly why this would be beneficial.

5. The circuit breaker is rated for 24V and 40A. It contains what appears to be a bimetal switch. Presumably the heat generated when the current rating is exceeded bends the bimetal into an open position. I have found that about 30 seconds after opening, the breaker switch on my mower has cooled enough to close and the mower may be restarted. I also found that heating directly with a hair dryer does not cause the bimetal to open, so it must be quite hot when it does.

6. There is a 68 ohm resistor inside the circuit breaker. It would provide a current path whenever the breaker opens, and is here presumably because of the inductive load presented by the motor. I'm admittedly curious about why the resistor is there and details of what it really does. (How I got in the position of prying open the circuit breaker is a story for another day.)

7. The Charger Interface Board is a maze of components and it would take a long time to break it down into a detailed schematic, so for now it remains something of a black box. The main features (not shown here) are 4 diodes + 1 capacitor (full wave rectifier?), an LM317 regulator, and a 14-pin IC. There are also oodles of resistors and some more diodes and capacitors. All I know for certain is, as shown in the schematic, that it contains the two indicator lights and receives the charger plug.

Tuesday, August 11, 2009

Getting replacement parts; customer reviews at amazon.com

Table of Contents

Important note: if you have a question to ask, please ask it at Lawn Mower Forum, either in the Black & Decker area or the Electric & Battery Operated area at that website. I apologize for being unable to handle individual requests for help posted on this blog or sent by email.


In the process of making up for three years of not blogging, today I'll post the mower review I wrote at amazon.com. Yet to come are photos of the mower's innards, a basic circuit diagram, and some trouble I went through in recent months to fix the mower.

Getting replacement parts

Here are extremely useful links for all CM1000 and CMM1200 owners. Replacement parts can be ordered online from ereplacementparts.com:

At the ereplacementparts website, you'll need to click on the appropriate type number in order to see the drawing and parts list for your mower. Type numbers are similar to software version numbers: whenever Black and Decker upgrades the mower design, it increments the type number. Type 5 was the final version of the CMM1000.

You will find the type number printed on the back of the mower, facing you as you are pushing it:


Model CMM1000, Type 5


Reviews at amazon.com

Here are the customer reviews for the CMM1000 and CMM1200 at amazon.com:

Here is my own review at amazon.com of the CMM1000, written after I had used it for a full year:
_____
(Rated 4 stars out of 5)
Good mower, but not for large lawns

May 24, 2007
By Mark W

I've had this lawn mower for 1 year now, and am thoroughly happy with it. My wife and like the quiet motor (about as loud as a vacuum cleaner, but much quieter than a gas engine mower). It is a good mower for small lots. We have a 1/4-acre, and one battery charge can do about 3/4 of our yard. I typically mow half the yard, let the battery recharge, then finish the yard later that day or the following day.

Two important points on mower care:

(1) Keep the blade sharp. Performances degrades noticeably with a dull blade. I bought a second spare blade, and change the blade when the one on the mower becomes dull. Then I can sharpen the dull blade at my leisure, and still have a working mower in the meantime.

(2) Keep the battery charged, and stop mowing when the battery charge gets low. Letting the battery run down will shorten it's useful life. I've calculated that it only costs about $3 extra a year to keep the battery on the charger when not in use. If the battery indicator gets low while mowing, stop and recharge it rather than continuing mowing on a low battery. It might sound inconvenient, but I do prefer this to having to run out and buy gasoline for a gas mower. Also, keep the battery charger on during the winter.

Having looked inside this mower, it does look like there is room for a larger capacity battery. Somebody who is mechanically and electrically inclined could probably increase their mowing time by 50% or more by retrofitting a longer-lasting battery. (Anybody who tries this assumes any and all risks involved, of course ...) It uses two 12-Volt sealed-lead-acid batteries to generate 24 Volts.

Things I like about this mower are:

The easy wheel height adjustment, which takes about 2 or 3 seconds to do. The height adjusts in 1/3-inch increments. I like to cut grass a little shorter along sidewalks than in the main part of the yard, and it's easy to do this.

Mowing in "mulch" mode. I don't need to collect and dispose of grass clippings, though one can use the grass-collector that is included with the mower if one wishes.

Using the mower to cut up raked leaves and light brush.

Not buying gasoline.

Starting the motor is very easy.

Two things I don't like are:

Dull blades do not cut worth a darn. It seems that gas mowers can still cut grass fairly well with a dull blade.

Sharpening the blade could be easier if the blade did not have this twisty, bent shape.

UPDATE, Aug. 2009
I had to replace the circuit breaker on the mower a month or so ago; the mower is now 3 years old. It cost $19.00 to fix on my own.

The problem was that the mower would keep shutting down after running just 5-10 minutes. After waiting about 30 seconds it could be started up again, only to shut off again after a short while. It's running okay now, but it took me some time to diagnose the problem correctly.

Replacement parts are available [...]:
[...]
Search on cmm1200 at that website if you have the cmm1200 model.

_____
Note: The good people at amazon.com had edited out the replacement parts link "[...]" from my review; it is the www.ereplacementparts.com website I gave above.

Monday, August 10, 2009

Three years and three months ago . . .

Table of Contents

Important note: if you have a question to ask, please ask it at Lawn Mower Forum, either in the Black & Decker area or the Electric & Battery Operated area at that website. I apologize for being unable to handle individual requests for help posted on this blog or sent by email.


I am three years behind.

My wife Pat and I bought our cordless electric mower just over three years ago. Wanting to cut down on home expenses, we bade farewell to the man we had been paying to cut our grass and decided we'd start doing it ourselves. We just had to pick out our new lawnmower.

This was the spring of 2006. While there was already a considerable movement towards using less energy, it had not really hit the mainstream. This was just before Al Gore's An Inconvenient Truth would play in theaters nationwide. Corporations were not yet bandying about their Green products with the alacrity they do today, the Toyota Prius notwithstanding. There was just our reluctance to using a gasoline powered mower, both for the noise it made and the annoyance of having to buy gasoline for it. So we went out and bought a battery powered model, the Black and Decker CMM1000*, for $450.

As I've used this mower I have learned to maintain it and not be annoyed with its shortcomings. Being fairly handy with electronics and mechanical things, it has not been difficult--for the most part. But it may be more difficult for others, and that is why I am starting this blog. Battery powered mowers have different issues than the gas mowers many of us grew up with. My main hope is that people find this blog a useful resource as they deal with the frustrations that can come with owning and using a cordless electric mower. I had wanted to start blogging about, or at least documenting the mower, the first summer we had it, but am just now getting around to it. Three years later.

-----

*The CMM1000 is no longer available, having been replaced by the newer CMM1200.

-----
Update, 6/30/2011: This blog now has a Table of Contents

.