Table of Contents
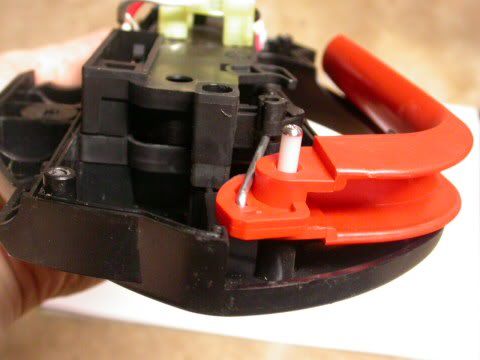
Our friend, who owns a CMM1200 mower, was unable to run her mower because of a broken hinge pin on the orange switch lever. This is the pin that allows the switch lever to pivot and turn the mower on:
Important note: if you have a question to ask, please ask it at Lawn Mower Forum, either in the Black & Decker area or the Electric & Battery Operated area at that website. I apologize for being unable to handle individual requests for help posted on this blog or sent by email.
From the Black & Decker CMM1200 Instruction Manual.
Before I detail how to fix this, let me just say this appears to be a common problem on the CMM1200, judging from owners' comments at both Amazon and eReplacementParts. It also looks like Black and Decker later redesigned the mower so that, in the Type 2 version, the pin is a $1 replacement part instead of a part of the larger, more expensive switch clamshell. So owners of CMM1200 Type 2 mowers may want to simply order the pin replacement here.
To fix my friend's mower (a Type 0 version, which I didn't even know existed until now), it was necessary to come up with some makeshift hinge pin, and drill a hole in the outer clamshell to accommodate it. If possible, I wanted it to:
- Be made of metal, or include metal, so that it would not break again, and
- Not have exposed screw threads that would rub against (and possibly damage) the orange switch handle.
- A 1-1/2" long, 4-40 screw, (preferably stainless steel or brass, or other non-rusting material)
- A 1" long, 3/16" diameter nylon spacer
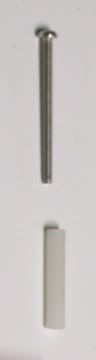
Screw and spacer
Tools I used for this job include:
- A power drill
- A screwdriver for size T25 Torx head screw
- Drill bit for 4-40 tap - ideally size #43, but 5/64" worked for me.
- A 4-40 tap and tap wrench
- A hole punch
- A hand file
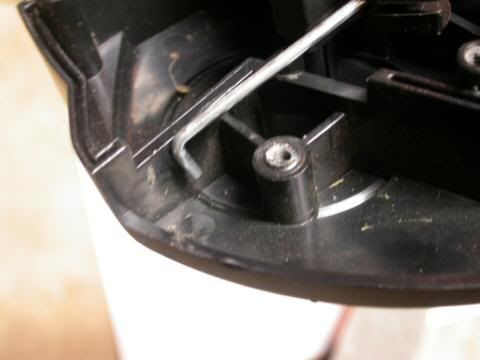
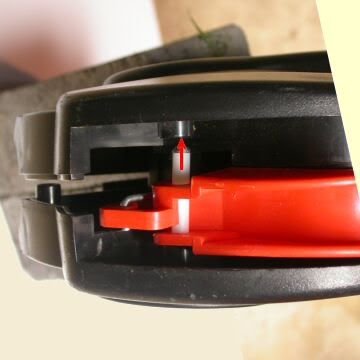
Drilled-out portion of lower clamshell. This is where the original plastic pin was located before it broke off.
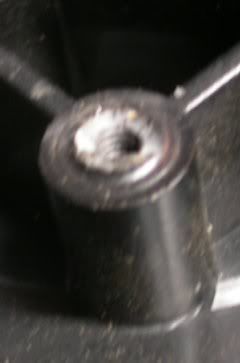
Close up view.
I won't offer instructions on how to tap a threaded hole -- it's really better to be shown in person how to do this, as it is just too easy to do it wrong and strip the threads. If you don't have the means to tap threads yourself, consider drilling a 1/4" deep hole that you can slip the 4-40 screw into; a 1/8" drill would work for this.
The screw head was too big to fit into the socket of the upper clam shell, but not by too much. I inserted the screw in my power drill, turned on the drill, and rubbed the screw head against a hand file until it finally fit in the socket. The locked-on feature of my drill made this easy, as it freed up a hand that would otherwise have to hold the trigger in the on position.
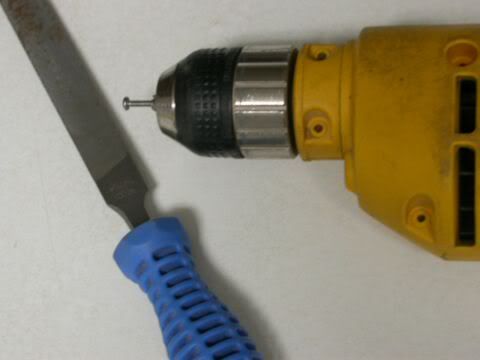
Insert the screw far enough so that the end threads are not damaged by the drill chuck.
Next, I hand-tightened the screw and spacer into the threads in the lower clam shell. It would be easy to strip the plastic threads by overtightening with a screwdriver, since it is a metal screw and the threads are rather small. (Ideally I would have preferred larger 6-32 threads, but I couldn't think how to incorporate that screw size in an easy, satisfactory way.)

The lower plastic clam shell (which used to include the now-broken-off plastic pin) and new hinge pin.
For the final steps:
- the spring and switch lever are slipped over the makeshift pin
- the heavy wire switch link is fitted into the hole in the switch lever
- the two outer clam shells are screwed together
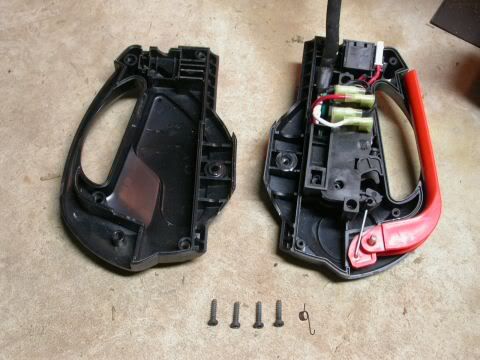
Upper clam shell at left; lower clam shell with orange lever at right. At this point of the assembly process, I had no idea what the spring (to right of 4 screws) was for. Nor did I include it when taking this photo; what you see here is a sketch of the spring that I have photoshopped into the picture. In fact the spring should already be in the assembly here, not laying aside with the still-to-be-used parts.
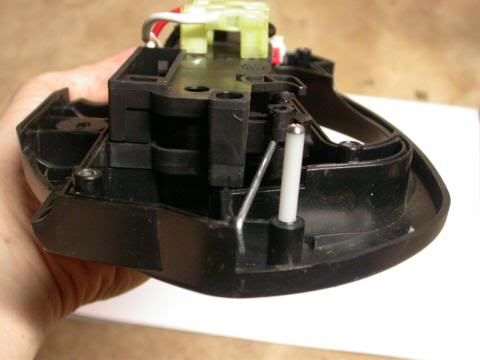
Lower clamshell, with orange lever and new hinge pin.
Upper & lower clamshells, showing socket that accepts the screw head.
(Pssst! Don't forget the spring -- missing here, see next pic).
(Pssst! Don't forget the spring -- missing here, see next pic).
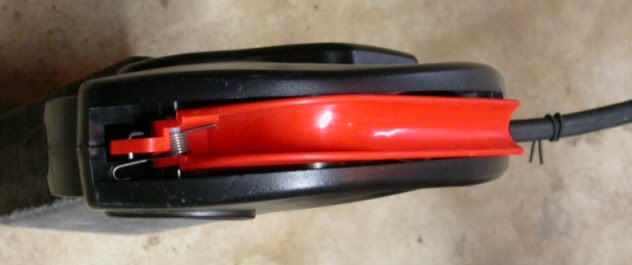
The switch assembly is finally together, including the spring.
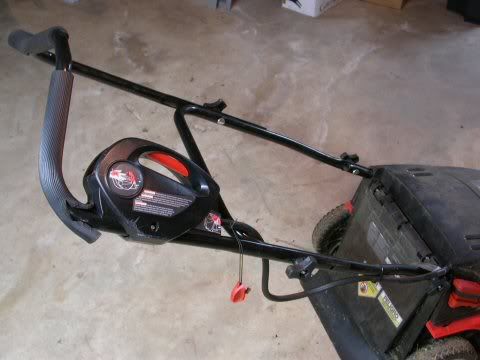
After testing that the mower will start, you are ready
to reattach the switch assembly to the mower handle.
to reattach the switch assembly to the mower handle.
There are any number of ways to fashion your own hinge pin.While 3/16" is a suitable and easy-to-find part diameter, it really just needs to be able to fit though both the 0.227" holes in the orange handle as well as the 0.205" hole in the upper clam shell. At eReplacementParts, "Jeff DC" has suggested cutting 1-1/2" from a standard door hinge pin.
Finally, for those of you who have yet to break the plastic pin on your mower, you might consider drilling a hole through it for a 4-40 screw, which would then provide a metal reinforcement.
Update, 9 Sep. 2012: It is worth mentioning here that a lot of people have been successful using a 3/16" x 1-1/2" tension pin, as first commented on by Catherine in August of 2010. Also known as roll pins or spring pins, people have obtained them at True Value Hardware, Ace Hardware, and Lowe's for less than $1.00. (Presumably Home Depot, and other home centers and hardware stores, would have these as well.)
So, a big Thank You to Catherine for the idea.

Hi Mark:
ReplyDeleteThanx for posting- good to know if or when I need to do this repair.
Just a FYI - The B+D CMM1200 appears in Weird Al Yankovic's White and Nerdy video:
http://www.youtube.com/watch?v=N9qYF9DZPdw
Right in the beginning...
CU soon,
Wes
Hi Mark,
ReplyDeleteThank you for your detailed posting which encouraged me to beat the system of "planned obsolescence."
I did not want to splurge on taps or a $1 part, so I drilled out the original plastic pin halves and replaced the pin with a metal 3/16 by 1 1/2 inch Tension Pin purchased at True Value around the corner for .25 (that's .25 cents), PLUS TAX.
Works great!
Off to mow now...vrrrrrrmmmm...
Thanks Mark for such a detailed repair guide for the CMM1200. It saved me - a mechanically challenged single mom - a lot of time and effort. What a cheesy design by B&D. They need to hire you as a consultant. Thanks again!
ReplyDeleteThanks for the detailed instructions and photos. I'm not mechanically inclined but the nearest factory service center is 3 hours away. That service center converted my CMM1000 to a CMM1200 because of a recall and the handle setup on the CMM1200 is not nearly as durable. It's a $1 part from B&D but they sent it free of charge. I just drilled out the hole and put it back together as shown. Thanks from Redding, CA
ReplyDeleteThanks - Just what I needed! The pin broke on me yesterday & your post tells me what I need to do to fix it. Think I'll try to cobble together my own pin rather than wait for the replacement to arrive in the mail. You think B&D would have designed a more robust hinge!!
ReplyDeleteThank you kind sir for posting this. Mine just broke this afternoon and I figured I'd have to buy the entire assembly. What a waste of material that would be.
ReplyDeleteThis isn't the first lawn mower safety switch I've had break on me. Black and Decker made the other mower I owned too and the same thing happened. I do not know why I bought another Black and Decker. They make a lot of garbage parts. Hopefully your solution will fix it for a while. I notice the key is extremely hot when I remove it too. That doesn't seem right.
Thanks again.
Thanks so much for this article. The photos were a huge help, I managed to fix the mower quickly and avoid the hassle of taking it in for repair. It amazes me that they put a plastic part in when a metal one would not cost much more.
ReplyDeleteTHANK YOU! THANK YOU! THANK YOU! You've made my day with these great ILLUSTRATED instructions!! Just can't thank you enough!!
ReplyDeleteMary Jo
Thank you for this great article and pictures. Thanks also to Catherine's advice above about getting the metal 3/16 by 1 1/2 inch Tension Pin; that did the trick. I got a little confused about the spring, but the picture helped. Happy Independence Day!
ReplyDeleteThis post is wonderful! My handle broke months ago but thanks to these instructions, I fixed it today in about half the time it would have taken me to drive the B&D service center, and spent less than $1 in parts. I took the tension pin approach (thanks Catherine), and the mower is back in business. Thank you!!
ReplyDeleteDenise
My pin broke months ago, and I had just been dealing with it. It will still function with a broken pin, but boy is it a pain. I didn't know what was broken, so I just decided that I was going to bypass the switch with a regular switch that I had lying around. I had these plans to mount it to the top of the clamshell. So I went online to find a schematic for the wiring, and not only did I find a schematic, I found out what was broken - and that it was a common occurrence in these machines! Such a simple fix, thank you so much!
ReplyDeleteThank you so much for your clear directions! I had been disassembling the clamshell, jamming the switch into place, putting it back together, cutting the grass and then disassembling the clamshell again to unjam the switch so I could recharge. You have saved me so much time and hassle! Hope something really nice happens to you soon!
ReplyDeletethanks for the great pictures. i had actually figured out what was wrong, drilled a hole, and had the replacement bolt w/nut but couldn't figure out how to place the spring. my handle broke on the last mow before fall. it's spring now and i did not know what position to place the spring. i was dreading having to fold the mower, hoist it into my sedan, and drive it out 15 miles to the B&D repair. great pictures! thanks again!
ReplyDeleteThanks for your article, especially the helpful photos for getting the spring back in correctly.
ReplyDeleteIn the end I used a 16d common nail cut own to the to fit the broken pin, which I figured woud last longer than the official replacement part!
WOW. Many thanks for this. Saved me much aggravation.
ReplyDeleteI had this problem and your blog help a lot, thanks.
ReplyDeleteI haven't posted here in a while, but I'm glad so many people are finding this useful.
ReplyDelete-- Mark
Yes thanks for the post with the pics...useful! I have the type 2 so just needed the $1 metal pin which I splurged on from eparts...now if I can just figure out how that pesky spring goes into this contraption I will mow my grass!
ReplyDeleteThank you, thank you, thank you. I couldnt have fixed my mower without your incredibly accurate pictures and directions! For my replacement pin I used a screw and cut off the head. I did drill out the holders where the cheap plastic pin was set. Did I say thanks??? Awesome!
ReplyDeletePlease add one more grateful person to the list of those who found that with the help of these wonderful people and their ideas and pictures I turned a daunting task into something that could be accomplished in half an hour for 36 cents. Amazing! Many, many thank you's to Mark and Catherine.
ReplyDeleteLuci in Washington
My turn to add my name to the grateful list. Thanks so much Mark and Catherine - saved me a trip to the repair center. I used the tension/roll pin method that Catherine mentioned. Lowe's sells the pins in sets of two for 80 some cents, so now I have a spare if for some reason the first one fails.
ReplyDelete-- Daryl in Washington
Thank you Mark and everyone else for your input... I was about 1/5 of the way through cutting my lawn last week when the handle fell off! I found one part of the broken hinge pin and (thankfully) the other parts hanging off the handle. My issue was that the other piece of the pin was still stuck in the clam shell, with no way to get it out. I ended up calling a B & D service outlet and the person mentioned that there had been some recalls on handles. So instead of bringing it to them, waiting for a repair, and paying too much money, I decided to search online to see what I could find.
ReplyDeleteCame across here and after some deliberation, a trip to Home Hardware (with no luck for any parts), and some further thought, I decided to drill a 5/64 pilot hole into the stuck pin, put in a 3/16 2" long wood screw, and lopped off the end with electrical crimping pliers after determining a suitable length. My makeshift metal hinge pin seems to be working fine, hopefully it'll last.
LC - Richmond Hill, Canada
Fantastic!! I too used a Tension Pin (3/16" x 1 1/2") purchased from Ace Hardware for 45 cents. Followed your instructions and works like a champ! Thanks again for your blog.
ReplyDeleteI too used the tension pin from Lowes. Thanks for the detailed instructions.
ReplyDeleteYet another grateful reader of your solution to the hinge pin problem. I had visions of spending several hundred dollars on a new mower until I came across your detailed instructions. Now I'm back in business! P.S. I hope you might be interested in posting instructions on replacing the battery - I think that might be the next thing to go.
ReplyDeleteCheers, Barry - Vermillion SD
This comment has been removed by a blog administrator.
ReplyDeleteThanks Mark! I fixed my 6 year old (Type 0 or 1?) mower handle using a screw that I filed down and cut. Work great!
ReplyDeleteMike
Thank you for this detailed post and the tension pin solution! I fixed the mower for $0.11 from the local hardware store and escaped the aggravating cycle of planned obsolescence. The photo showing pin and spring placement was especially useful.
ReplyDeleteThank you, thank you. I'm not real handy, but this was an easy repair. Thanks to Mark's original post and Catherine's suggestion of the tension pin, still 80 cents for a pair at Lowe's. I used a 3/16 drill bit to drill out the broken pins and the tension pin fit perfectly. I'll confess I spent $1.75 including tax because the 1.5-inch pin looked long, so I also bought a pair of 1-inch pins. But Catherine was right, of course.
ReplyDeleteShame on Black and Decker for using cheap plastic in such a crucial part where metal would've cost a few pennies more, if that. Now it's better than new!
Two years ago I replaced the pin with a plastic piece I had, and it finally gave way. Had a great metal piece I had ready... and now the mower will not start. Off to search for a new set of help instructions!
ReplyDeleteThanks so much for an excellent post! Just replaced my cracked pivot pin with a steel roll pin...worked like a charm and am back in business! Thanks again!
ReplyDeleteImportant note:
ReplyDeleteIf you have a question to ask, please ask it at Lawn Mower Forum, either in the Black & Decker area or the Electric & Battery Operated area at that website. I apologize for being unable to handle individual requests for help posted on this blog or sent by email.
Link to Lawn Mower Forum's main page: http://www.lawnmowerforum.com/forum.php
From there you'll find the Black & Decker section (under "Brand Specific Forums" and the Electric & Battery Operated section.
Best regards,
Mark